Javadocx Tutorial
Javadocx Tutorial
Javadocx is very easy to install. Usually it is just enough to unzip the package somewhere in your server and it is (almost) ready to go.
All packages included a JAR file with the library precompiled in the dist folder. Payment licenses also include the full source code of the library that can be changed but not redistributed.
Javadocx requires Java 8 or greater to be used.
- The folder where you want to store the resulting Word documents must have writing permissions rights.
- If possible, use always UTF-8 compatible editors to code your scripts or modify any script in the Javadocx library. The final Word documents have to be UTF-8 encoded and non UTF-8 characters may break the final document.
- All the content in a .docx file is stored in XML files so you should escape certain protected characters like the ampersand symbol (write & instead of &).
- Make sure that your web server has activated the .docx MIME type in case you want your users to download directly the resulting Word documents to the browser (if not IE will believe that your .docx is a .zip file).
WARNINGS:
There is no a priori restrictions about the OS and server software as long as it may run Java 5. That includes, of course, basically all LINUX and UNIX distributions as well as Windows and macOS.
Javadocx accepts external data for your reports and documents coming from virtually any data source and it is the responsability of the user to prepare it so Javadocx can represent it adequately. Javadocx DOES NOT require MySQL or any other specific Database software for its deployment and correct functioning.
You DO NOT need any copy of Microsoft Office Word to generate your Word documents.
Javadocx does also not need any kind of outbound connection to work so it does not depend directly of a working Internet connection or any kind of additional third party software.
Let's start with the standard "hello world" document:
You can see here the final result and download the corresponding Word document :
![]()

OK, this has been simple enough but not very rewarding. Let's go one step further and introduce a little more of formatting:
Now this starts to look a little nicer although there's still some work ahead:
![]()

At this point one may wonder if there is a simple way to "wrap" our document in a more beautiful frame including, for example, headers and footers and even a first page.
There are quite a few ways to do so:
As we have not yet talked about templates (base or custom) and the addHeader and addFooter methods require of certain concepts not yet introduced, we will restrict ourselves,by the time being (please, be patient), to the first of the available options.
We are going to add a default header with an image:
This is definitely starting to look much nicer:
![]()

Footers and headers can include photos, tables, standard text, lists, links, shapes, etcetera..
Now to continue we are going to populate our Word document with a series of standard objects:
- Lists
- Tables
- Images
- Charts
There are many other possibilities but we prefer to refer to the documentation for a complete set of examples in order not to clutter this tutorial with unneeded details.
Let us first include a simple unordered nested list after our "hello world" paragraph. In order to do so you should call the addList method:
The result looks like this:
![]()

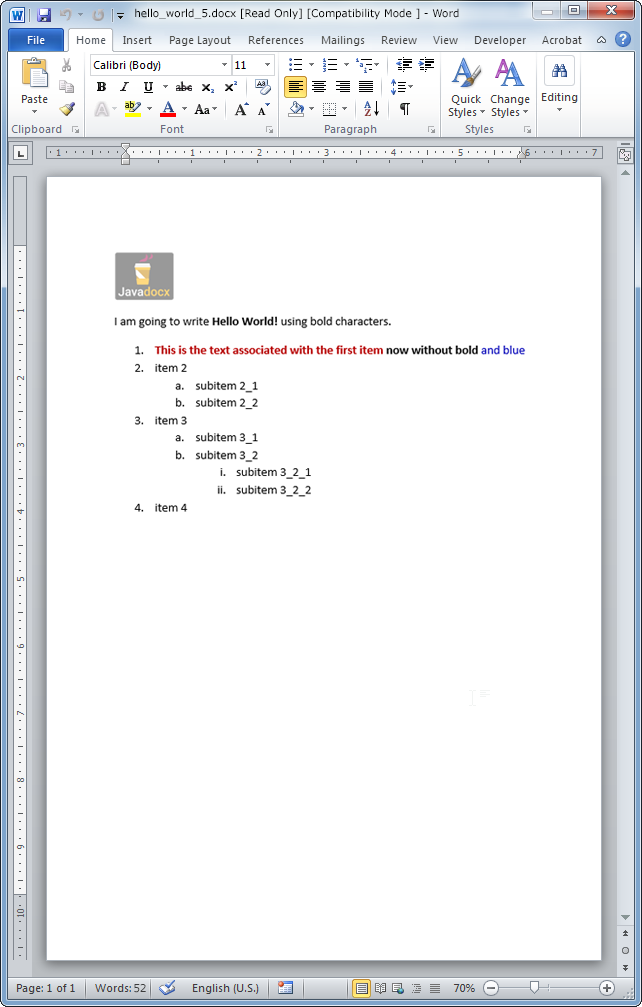
If you had chosen the second parameter to be 2 instead of 1 you would have got a standard numbered list. Now you may wonder:
- How can I insert something more than plain text as an item for a list?
The answer is a little elaborate but simple enough: you should create a WordFragment to achieve more sophisticated formatting:
The corresponding code reads:
And you get:
![]()
This way to insert elements one within the other may be extended to other cases very easily:
- Create a new WordFragment (WordFragment class).
- Include all the required content into the WordFragment with standard Javadocx methods.
- Insert the resulting WordFragment:
- Within a table.
- Within a list (only inline content).
- Anywhere in the Word document with the DOCXPath methods.
- In the headers and footers via the addHeader and addFooter methods.
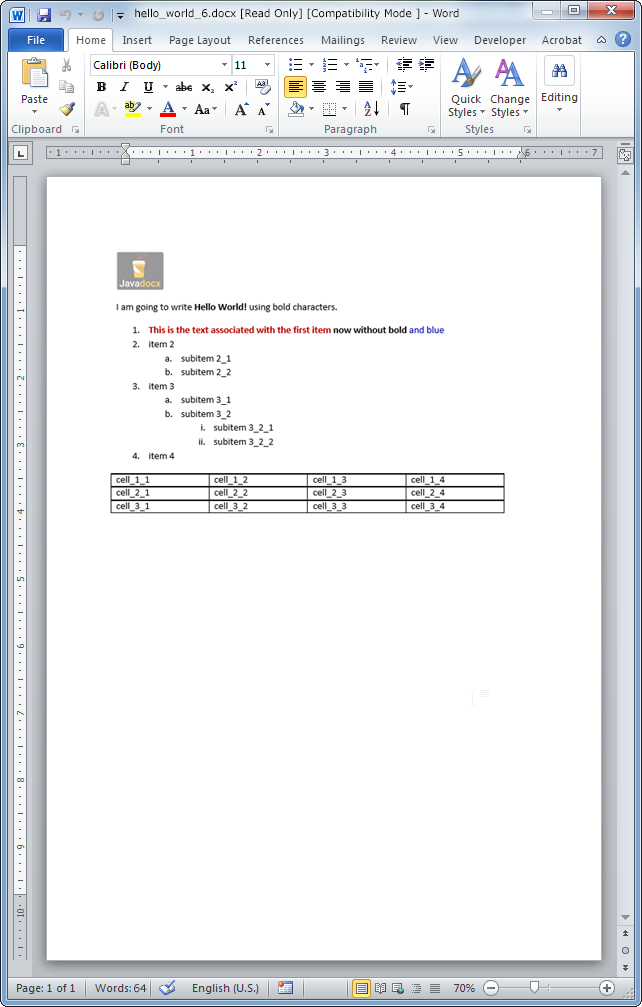
Now we will try to insert a simple table so our Word document gets richer in contents.
And you get:
![]()
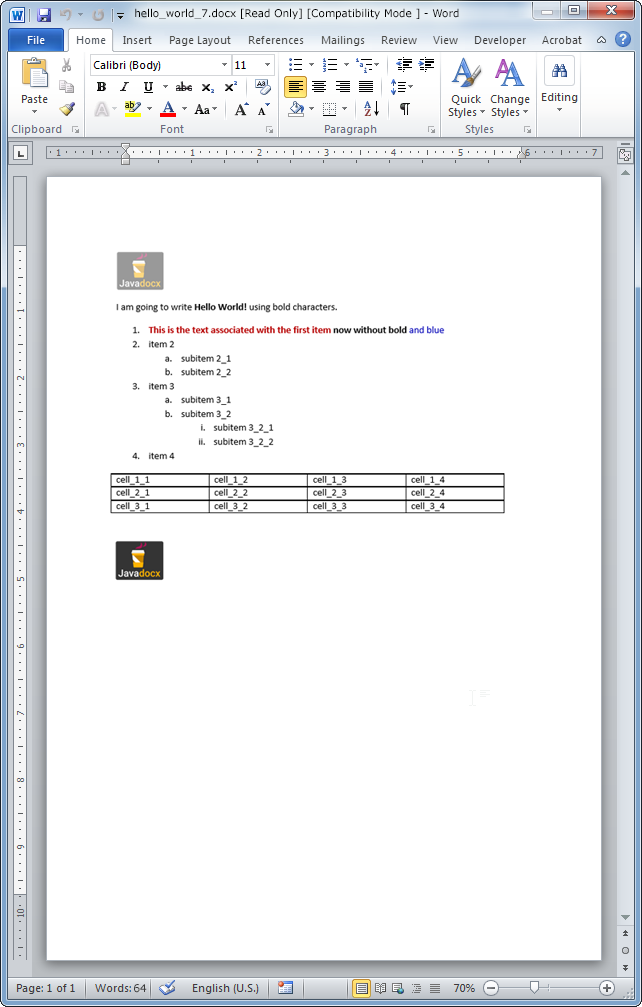
To insert an image is as simple as this:
This should render an image like this:
![]()
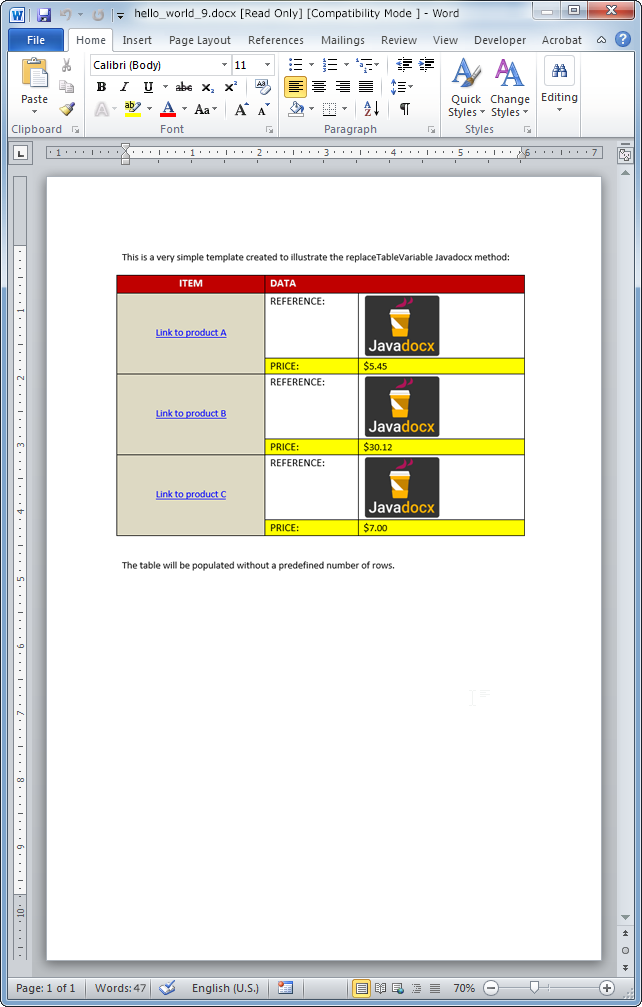
Loading a template and all their contents with Javadocx is as easy as using the CreateDocxFromTemplate class:
New contents can be added, replaced, removed, cloned and moved to this template.
The template methods allow replacing a placeholder by a single text or a whole WordFragment or an external document. And also add items to lists, fill tables, replace images, work with blocks and many other features.
For example, the following code replaces a placeholder by a new text:
This should output like this:
![]()

Other replacements such as images, lists or tables are quite similar.
This sample loads a template and add new rows to the table removing the initial placeholders:
This should output like this:
![]()
We hope that this tutorial has been of help and that you are now able to grasp all the potential uses that you may give to Javadocx in your professional projects. All packages include many samples to illustrate each method of Javadocx
Enjoy!!